
On my previous post What does the Build Team Do, I covered various topics about builds and devOps. Today, I want to go more in depth on what goes on when you press the run button which I briefly brushed over in the previous post. This does get quite technical but don’t fret. I have stopped myself from writing and reading up in depth about the topic to avoid going through the rabbit hole.
If you prefer looking at the slides, I’ll provide them below:
What is a Build
For the sake of those who did not read my previous post , I’ll repeat some of the content I shared previously.
You may recall when working on Java, C, or C++ you ran a Build by pressing pressing Build, Run, or Play button
or you “compile” your code on the terminal

But what does this actually do? As you may know, a build is just simply the process of converting your source code (i.e. .c or .java) to a binary/exectuable (i.e. .exe or .o).

An executable to put it briefly is the ready to run form of a program (hence why we call it an executable). An executable consists of instructions (i.e. machine code) that consists of zeros and ones assembled in a way the CPU understands. Some common locations where executables can often be found on Unix-Like Operating System (OS) under /bin, /sbin, /usr/bin, or usr/local/bin.
Steps In A Build
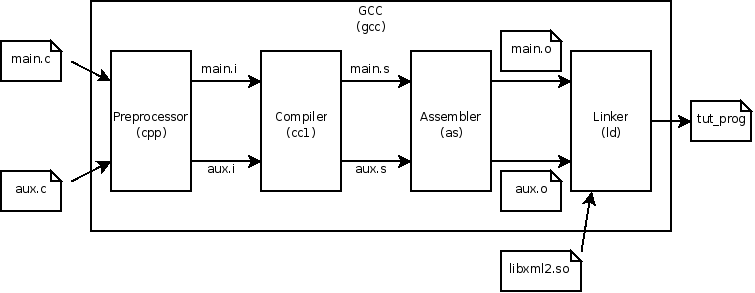
Turns out, there is actually a lot that goes on in a build. Your IDE or compiler abstracts the build process. Frankly, most developers will never need to understand how your compiler works nor do they need to understand the steps of creating a build. Here’s a diagram of what occurs when you are “compiling” (building) your program:

1. Preprocessor - Expands source code
Before your source code is translated to assembly or machine code, it first goes through a program which we call the preprocessor. Essentially the preprocessor expands and substitute your code by expanding macros and include files.
The preprocessor gives you the ability to:
- include header files
- object-like (i.e. constants) and function like macros (more on this below)
- conditional compilation
For those with no or limited C programming experience, here’s an example of a preprocessor:
#define MAX_BUFFER_SIZE 10

int main() {
    int arr[MAX_BUFFER_SIZE];
    ...
The output of the preprocessor becomes:
int main() {
    int arr[10];
    ...
Although it may look similar to a constant variable, macros are substituted by the preprocessor while the compiler will deal with variables. There are some things you can do with macros that const cannot do such as the example above where the array size can be easily changed. You cannot do this easily in C with a variable. For example, the code below is illegal in C89:
int max_buffer_size = 10;
int arr[max_buffer_size]; #this is illegal
Macros can do more than subsitute constant values. The power of macros are its ability to control what part of the source code to substitute (conditional directives) and the ability to write “function” like macros that does not have the overhead of function calls.
#ifdef DEBUG
printf("File: %s on line %d", __FILE, __LINE);
printf("Value of x: %d\n", x);
#endif
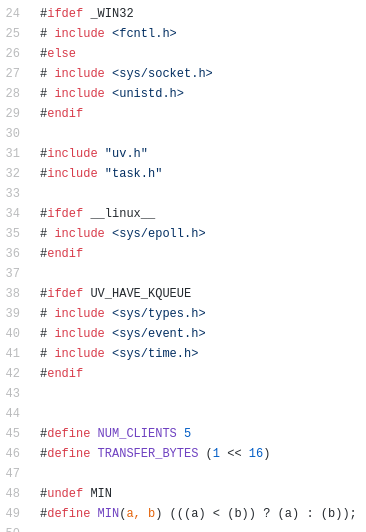
If the macro DEBUG is 1 or enabled (i.e. pass -DDEBUG to the preprocessor), the resulting source code will contain the block above. If not, the code above will not appear in the resulting program. This is especially important if you are working on software that supports multiple platforms (we’ll get to this later). But here’s a sneak preview (extracted from the source code of Node.js JS runtime):
The ability to control what part of the source code gets compiled is essential in software development. Not only is it useful to remove any debug code from the product, but it also enables programmers to control how a particular feature is implemented depending on the targeted platform. Perhaps you want to take advantage full advantage of the exclusive libraries that exist on each platform such as DirectX on Windows or Metal on Apple to render graphics. You can simply use a Macros to ensure you can split the code for Apple environments from Windows environment. In addition, perhaps there are some features that are unsupported on some platforms or you wish to turn off for the free version. You can simply use conditional macros to turn features on or off as you desire.
In regards to macro’s “function” like ability, here’s a short example:
#define PI 3.14
#define AREA(x) (PI*(x)*(x))
double area = PI * Square(9.5); //area = pi * r^2
The compiler will see the resulting source code below:
const double area_of_scope = (3.14*(9.5)*(9.5));
Side Note: A Quick Metric on Function Overhead Performance
On a side note, if you want to see how much performance hit function overhead can be, see the following example:
#include <stdio.h>
#include <stdint.h>
#include <time.h>

#define DIVISOR 3.56
#define DIV(x) ((x)/DIVISOR)

double div(uint32_t x) {
  return x / DIVISOR;
}

int main () {
  double sum = 0;
  clock_t begin = clock();
  for (uint32_t i = 0; i < UINT32_MAX; i++) {
    #ifndef DIV_MACRO
    sum += div(i);
    #else
    sum += DIV(i);
    #endif
  }
  clock_t end = clock();
  double time_spent = (double)(end - begin) / CLOCKS_PER_SEC;
  printf("%f", time_spent);
  return 0;
}
To measure the function overhead performance, I wanted to conduct a test where the function gets called a lot of times (hence why the program loops UINT32_MAX) and performs some expensive operation (float division are a bit expensive) so that results are very noticeable.
The program was compiled using no optimization (i.e. -O0) because any form of optimization will remove the need to create a new stack frame which would defeat the purpose of explaining the penalty of calling a function. You can verify this through looking at the resulting assembly code (i.e. -S) or running gprof (a profiling tool) with optimization enabled. You’ll see that they reduced the amount of stack frames created to 0. Meanwhile with no optimization, the function div gets called 4294967295/4294967295 as needed. Your compilers are very good at optimization.
Here was the result on my Raspberry Pi 3B, taking the average of 3 runs:
== WITH MACRO ==
Optimization 0: 143.475339

== NO MACRO - FUNCTION CALLS ==
Optimization 0: 193.950554666667
As you can see, there is a notiecable performance impact when we choose not to use a macro
Include Directives
In software development, it is normal to break down programs into many parts. This is particularly useful when specific parts of the code are frequently used by many other components. That’s where libraries come in. There’s no point of pasting the same code in various files or re-implementing code that already exists. Libraries make it easy to reuse and update code. If a particular library has a bug, you can simply fix the code that lies in one file or download the latest version. While your compiler does not care if you do not specify the library (i.e. stdio.h) when calling a function not defined in the same file, you’ll encounter a linker error (which I’ll get to later on).
/tmp/ccVUd15N.o: In function `main':
test.c:(.text+0xf): undefined reference to `print'
collect2: error: ld returned 1 exit status
Let’s look at an example to see what your preprocessor does when you include a header file with the following source code:
#include <stdio.h>
int main() {
  printf("Hello World\n");
  return 0;
}
If we were to run the preprocessor (i.e. gcc -E file.c), source code expands from 6 lines to 720 lines or 75B to 15.6KB file. The file takes up 208 times more space. So what is going on?
Include directives inserts the contents of the header files to the source code. So in the example earlier, most of the code is from expanding the contents of stdio.h library. Which is why you see lines such as these in the resulting source code that gets passed into the compiler:
extern int printf (const char *__restrict __format, ...);
extern int fseek (FILE *__stream, long int __off, int __whence);
A good example to visualize what is going on is expanding the following:
#include "include.h"

#include "declare_main.h"
#include "open_bracket.h"
#include "print_hello.h"
#include "close_bracket.h"
where each file contains a line of C code:
#include <stdio.h>
void main()
{
  printf("Hello World\n");
}
I find this to be a good example because each header file contains a single line of code which itself makes no sense. The code is only complete when you bring in all the header files together. I do understand this is not how you should be using header files but it’s an extreme example to visualize how include directives work.
2. Compile & Assembler
The job of the compilation and assembling stage is to create an object file which contains machine code but is not complete. The resulting object file is not executable. If we were to try execute the object file, we’ll get the following error:
Example:
$ gcc -c test.c -o test.o
$ chmod +x test.o
$ ./test.o
-bash: ./test.o: cannot execute binary file: Exec format error
The compiler will first translate the given high level source code into assembly which gets passed onto the assembler to be translated to machine language. Typically, each assembly instruction has a one to one corresponding machine code instruction unlike high level languages where a lot of lines of assembly code will be needed per instruction. An object file typically isn’t complete because it contains symbol references (i.e. variables and functions) not defined in the file itself and doesn’t have the instructions for the program to be executable. To make the program executable, the files must be linked which is done by the linker.
Note: To replicate the compile and assembling stage, run gcc with -c option
Note: To produce the assembly code, run gcc with -S option. You can use as to assemble the assembly code into binary.
3. Linker
A linker is a program that takes one or more object files & data and combines them into an exectuable file, a library file, or another object file. During compilation (the previous stage), the compiler will not complain if the code references symbols or functions in the code are not defined. To illustrate, here’s an example:
main.c
void honk();
void meow();
int main() {
    honk();
    meow();
    return 0;
}
where main.c contains function calls to honk and meow not defined in the code itself. So how does main.c know about the two functions? The simple answer is through declaraing to the compiler that the functions exist. The ability to call functions defined in other files is common in programming (run readelf -a main.o and you’ll see that meow and honk are located in the relocation section. I probably won’t explain what this is).
A linker resolves the missing references of symbols and functions not defined in a file by linking them with other files that does contain the implementation. In software developing, we like to berak prorgams into many smaller parts (especially in Object oriented programming) and use functions that are defined in other files. Therefore, to compile code referencing symbols or functions defined elsewhere, you need to declare (provide a signature or definition) them for the build to not break as seen in main.c. In main.c, the first two lines void honk(); and void meow(); declares to the compiler of the functions existence. Something simple as printf from the standard input and ouput library has to be declared in your source code. Although you may have never explicitly delcared the printf function in your programs, referencing (i.e. including) the standard input/output (i.e. stdio.h) library at the start of your source code actually contains the declaration of printf and all other functions the standard io library provides you. This is actually done by the preprocessor which I explained earlier.
One of the benefits of linkers is that they allow compilation to be done separately or in smaller manageable parts. A change in one module or file does not require recompilation of the entire project. All that is needed is to recompile and relink a single or a small set of modules. This is a time saving feature.

Though confusing, gcc is a C and C++ compiler that normally does all the steps of the build from preprocessing to linking object files. Here’s the description of gcc from the man pages:
When you invoke GCC, it normally does preprocessing, compilation, assembly and linking.
Demo
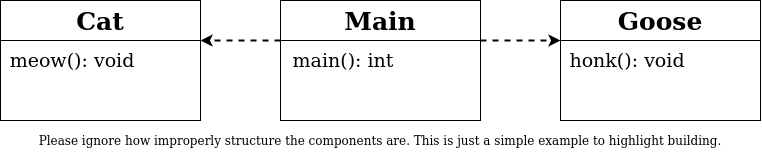
Let’s go over to the terminal and work on building a program step by step. We have the following 3 files:
main.c
void honk();
void meow();
int main() {
    honk();
    meow();
    return 0;
}
goose.c
#include <stdio.h>
#define PI 3.14
#define Square(x) ((x)*(x))
void honk() {
    double area = PI * Square(9); //area = pi * r^2
    printf("The Goose Honks the area of the circular pond: %.2f m^2\n", area);
}
cat.c
#include <stdio.h>
void meow() {
    printf("The Cat Meows at its friend\n");
}
Here’s a diagram, please ignore the fact the diagram may not be a proper UML diagram (I forgot how it works).
Step 1 - Preprocessing
The first step in the build process is preprocessing. To see what the compiler (gcc in our case) sees, we can run gcc -E <file.c>.
If we were to run the preprocessor for the file goose.c, we can see the following:
# 4 "goose.c"
extern int printf (const char *__restrict __format, ...);
void honk() {
  double area = 3.14 * ((9)*(9));
  printf("The Goose Honks the area of the circular pond: %.2f m^2\n", area);
}
(this is just the snippet of the output from the preprocessor and not the entire time)
As expected, all the macros of been expanded and substituted along with the declaration of printf to tell the compiler that the function exists.
Step 2- Compilation and Assembler
Once the source files have been preprocessed such that all external symbols have been declared and all macros have either been expanded or ran, we need to compile the code to produce the assembly code of our source files. This can be done using the -S option in gcc. Let’s look at the ouput of compiling main.c (file: main.s):
        .file   "main.c"
        .text
        .globl  main
        .type   main, @function
main:
.LFB0:
        .cfi_startproc
        pushq   %rbp
        .cfi_def_cfa_offset 16
        .cfi_offset 6, -16
        movq    %rsp, %rbp
        .cfi_def_cfa_register 6
        movl    $0, %eax
        call    honk
        movl    $0, %eax
        call    meow
        movl    $0, %eax
        popq    %rbp
        .cfi_def_cfa 7, 8
        ret
        .cfi_endproc
.LFE0:
        .size   main, .-main
        .ident  "GCC: (GNU) 10.2.1 20201125 (Red Hat 10.2.1-9)"
        .section        .note.GNU-stack,"",@progbits
Notice how there’s call to meow and honk but there’s no label anywhere in the code. The linker will resolve this issue in a moment (though after we assemble the code from assembly to binary).
Although assembly is an extremely low-level language, our CPU does not understand ASCII characters. We need to translate the resulting assembly code to ones and zeroes. Luckily, assembly is a mnemonic language (symbolic language) meaning that each command in Assembly typically has a corresponding opcode (binary instruction). So we will need to run the assembler to transform our assembly code to machine language. This can be done using the assembler as. But let’s just use the -c option in gcc to do all the steps we covered so far: preprocessor, compilation, and assembly stage.
$ gcc -c main.c
$ gcc -c cat.c
$ gcc -c goose.c
If we were to look at the symbols for meow and honk for our newly created object file of main.c (file: main.o) using readelf, we’ll see the following:
$ readelf --syms main.o | grep -E "honk|meow"
     9: 0000000000000000     0 NOTYPE  GLOBAL DEFAULT  UND honk
    10: 0000000000000000     0 NOTYPE  GLOBAL DEFAULT  UND meow
Notice UND appears in our object file. The object file has absolutely no clue where honk and meow are defined because it’s defined in a different object file. Which comes to our most interesting topic in the build, linkers.
Recall how I mentioned that object files are not executable. To clarify, there are three main types of object files:
-
Relocatable object files
-
executable object files
-
shared object files
The object files main.o, cat.o, and goose.o are not executable object files as I have repeated many times but they are relocatable files. Relocatable files are binary code and data formatted/structured in a way where it can be combined with other relocatable object files to create an executable object files. Let’s look at one of the relocatable file:
$ file main.o
main.o: LF 64-bit LSB relocatable, x86-64, version 1 (SYSV), not stripped
Notice how the the file utility tells us that main.o is a relocatable object file. (It also gives us a lot of different information such as LSB for Lease Significant Bit -> Little Endian, x86-64 architecture).
Here’s a typical ELF (The standard Executable & Linkable Format Linux uses) relocatable format:

We can see the same in our newly created object files as well using objdump:
$ objdump -x main.o

main.o:     file format elf64-x86-64
main.o
architecture: i386:x86-64, flags 0x00000011:
HAS_RELOC, HAS_SYMS
start address 0x0000000000000000

Sections:
Idx Name          Size      VMA               LMA               File off  Algn
  0 .text         0000001f  0000000000000000  0000000000000000  00000040  2**0
                  CONTENTS, ALLOC, LOAD, RELOC, READONLY, CODE
  1 .data         00000000  0000000000000000  0000000000000000  0000005f  2**0
                  CONTENTS, ALLOC, LOAD, DATA
  2 .bss          00000000  0000000000000000  0000000000000000  0000005f  2**0
                  ALLOC
  3 .comment      0000002f  0000000000000000  0000000000000000  0000005f  2**0
                  CONTENTS, READONLY
  4 .note.GNU-stack 00000000  0000000000000000  0000000000000000  0000008e  2**0
                  CONTENTS, READONLY
  5 .eh_frame     00000038  0000000000000000  0000000000000000  00000090  2**3
                  CONTENTS, ALLOC, LOAD, RELOC, READONLY, DATA
SYMBOL TABLE:
0000000000000000 l    df *ABS*    0000000000000000 main.c
0000000000000000 l    d  .text    0000000000000000 .text
0000000000000000 l    d  .data    0000000000000000 .data
0000000000000000 l    d  .bss    0000000000000000 .bss
0000000000000000 l    d  .note.GNU-stack    0000000000000000 .note.GNU-stack
0000000000000000 l    d  .eh_frame    0000000000000000 .eh_frame
0000000000000000 l    d  .comment    0000000000000000 .comment
0000000000000000 g     F .text    000000000000001f main
0000000000000000         *UND*    0000000000000000 honk
0000000000000000         *UND*    0000000000000000 meow


RELOCATION RECORDS FOR [.text]:
OFFSET           TYPE              VALUE
000000000000000a R_X86_64_PLT32    honk-0x0000000000000004
0000000000000014 R_X86_64_PLT32    meow-0x0000000000000004


RELOCATION RECORDS FOR [.eh_frame]:
OFFSET           TYPE              VALUE
0000000000000020 R_X86_64_PC32     .text
Step 3: Linking
As I stated earlier, producing the object file for the project does not mean you can execute the program. The object files may contain instructions that your CPU could somewhat understand, it is not complete. Object files will have undefined references to symbols and functions that are not defined within the files themselves. To illustrate, imagine you are running an errand to deliver a package to a person’s house using the bus. However, you are not given the address of where the house is, who is the receiver, nor have the package with you. You cannot complete the tasks with those missing information. That’s where the linker comes in handy. The information you need to perform some action in software development is often defined elsewhere. The linker combines all the object files, static files and performs symbol resolution and packaged them into one executable file.
We will be using ld to link our object files to relocate data and tie up symbol references.
The basic idea is to link all the object files generated for this project like so:
ld cat.o goose.o main.c -o prog
Unfortunately, it’s a lot more complex than that. We also need to link other files which I won’t go into. The actual command is given below:
ld /usr/lib64/crti.o /usr/lib64/crtn.o /usr/lib64/crt1.o /usr/lib64/libc.so cat.o goose.o main.o -dynamic-linker /lib64/ld-linux-x86-64.so.2 -o prog
(Thanks to ZeZNiQ for outlining the crt files needed to execute on amd64 (x86_64))
Once the files have been compiled, assembled, and linked, we can execute the program:
$ ./prog
The Goose Honks the area of the circular pond: 254.34 m^2
The Cat Meows
Let’s inspect the executable itself using objdump:
If we were to look at the code for main, we see the following:
0000000000401177 <main>:
  401177:       55                      push   %rbp
  401178:       48 89 e5                mov    %rsp,%rbp
  40117b:       b8 00 00 00 00          mov    $0x0,%eax
  401180:       e8 c2 ff ff ff          callq  401147 <honk>
  401185:       b8 00 00 00 00          mov    $0x0,%eax
  40118a:       e8 a7 ff ff ff          callq  401136 <meow>
  40118f:       b8 00 00 00 00          mov    $0x0,%eax
  401194:       5d                      pop    %rbp
Notice how our exectuable has an address associated with meow and honk function calls. Our linker is responsible for the symbol resolution and relocation. In the object files, the code and data sections starts at address 0. But when the linker combines various object files, it has to do two things: (1) associate a memory location for each symbol definition (2) modify all references to those symbols to the associated memory location. Anyhow Linkers are complex and would span a few blogs. I still don’t have a full picture of how linkers work. If you want to learn more, I would suggest reading up a lecture I found online that gives a nice explanation about the build process but in more depth: Linking. For a full series of blog post on linkers, try reading Linkers blog series from the creator of the Gold Linker himself.
Build Definition - Summary
-
build is the process of converting source code into an executable
-
builds have a few steps such as compilation and linking
-
compilation is the process of converting source code into machine code saved in the form of an object file
-
linking is the process of combining object files into an executable
Quick Overview of Static and Dynamic Libraries
As stated earlier, it’s very normal for different programs/projects to share the same functions in software development. Notable examples are printf, sqrt, cos, fopen. Libraries allow programmers to reuse common functions among different projects and programs. This saves development time and prevent reventing the wheel. It also allows a consistent and reliable set of functions with defined behavior that can easily be updated by either updating the code or downloading the latest library. Some examples of libraries outside of C you may be familiar with are:
- DirectX SDK (Microsoft’s Multimedia API used frequently by Videogame programmers)
- Asio (C++ library for network and low-level I/O programming)
- Boost in C++
- GTK (GNOME GUI library) or Qt (another GUI library)
Static Libraries
Static Libraries are libraries that are linked during the build process and not during runtime. Static libraries have the extension of .a and are also known as archives. They are known as archives because they are a collection of object files.
 Note: The image is incorrect. An archiver creates the static library and not the linker.
For instance, let’s say I generated an archive file named libanimal.a which is an archive that contains cat.o and goose.o. I can simply link it to a program like so:
gcc main.o -L. -lanimal -o prog
This is much easier than typing all the files that composed the static library such as the below:
gcc cat.o goose.o main.o -o prog
You can easily see how scalable this becomes when you are working on larger projects. But that’s not the entire point of static libraries.
Benefits
- If multiple components or projects use the same set of libraries, no need to recompile
- Saves compilation time, compile once and link it each time
- makes distributing object files much easier (since it’s like a zip file where it combines various files into one)
You can also easily distribute your code to your clients and friends saving them the trouble of compiling the code and somewhat protect your code from others by not giving them the source code.
To see the object files that composes the static library, use the tool ar with the option -t:
$ ar -t libanimal.a
cat.o
goose.o
Dynamic Libraries
Dynamic Libraries (also known as shared libraries) are linked during runtime whenever we run the program. Which differs from static libraries where it gets link during the build process. Dynamic libraries have the extension *.so on UNIX/Linux systems and on Windows they have the extension *.dll.
Based on the name dynamic library and shared library we can infer the following:
- dynamic libraries are loaded and linked during RUNTIME
- shared library: means multiple programs share the same library in memory by linking to it
Benefits
- Executable is smaller because definition isn’t in the executable itself (i.e. the code for the libraries are stored in the computer at some common location such as /usr/lib
- All programs using the library just need to link to the definition loaded in memory
- Easy to update if a bug exists
You can view the dependencies programs have by running ldd. It’s a useful tool to debug weird program behaviors:
 ldd /bin/ls
	linux-vdso.so.1 (0x00007fff41141000)
	libselinux.so.1 => /lib64/libselinux.so.1 (0x00007f11d1688000)
	libcap.so.2 => /lib64/libcap.so.2 (0x00007f11d1482000)
	libc.so.6 => /lib64/libc.so.6 (0x00007f11d10bf000)
	libpcre2-8.so.0 => /lib64/libpcre2-8.so.0 (0x00007f11d0e3b000)
	libdl.so.2 => /lib64/libdl.so.2 (0x00007f11d0c37000)
	/lib64/ld-linux-x86-64.so.2 (0x00007f11d1ad5000)
	libpthread.so.0 => /lib64/libpthread.so.0 (0x00007f11d0a17000)
Static v.s Dynamic Libraries
Cons of Static Libraries:
- generate bigger executable files since library is integrated inside executable
- less memory efficient - each program has their own copy of the library
- Not easy to update - Requires all programs to update their copy of the library if a bug exists
Cons of Dynamic Libraries:
- Since many programs link to the same library, can cause compatibility issues if library gets updated or removed
- Extremely annoying to install program
Image Credits (Not exhaustive)
- Olivier Pinçon & Sébastien Granjoux - http://library.gnome.org/users/anjuta-build-tutorial/2.26/build-gcc.html.en, GFDL
More Resources:
-
A nice video covers the linkers: Static and Dynamic Linking using GCC for Linux - YouTube
-
Another nice video that covers linkers but more advance: CppCon 2018: Matt Godbolt “The Bits Between the Bits: How We Get to main()” - YouTube
-
A series of blogs about Linkers from the creator of Gold (another linker): Linkers « a3f.at
-
Some notes about linkers: Linking